 A few years ago I thought I would try making croissants sometime. Then I was dissuaded by being told it was very time consuming and difficult.
 Then my friend Alison gave me The Tivoli Road Baker and it’s got a whole section on viennoiserie and I read the instructions and I thought… well, how hard can it be? I just need two days of relatively cool weather.
Friends, that was yesterday and today. I have now made croissants.
 I started by buying Danish butter – Lurpak – because it’s 82% fat, although I don’t know if it’s cultured as the recipe recommends. Then I just followed the recipe for the dough, which turned out to be a lot easier than I thought. Then it was into the fridge overnight.
 Today, I did the laminating, which again is a whole lot easier than I expected. I think the process has a bad name because it really does take a long time – but that’s the resting time, not the active time. The rolling out of each stage was easy and only took a few minutes. And in fact even the process of turning the dough into the croissants – cutting into triangles and stretching and rolling up – was really easy.
 Of course, things did not go entirely right. Because it was a cool day, I decided to follow the instructions for proofing in the oven. I put a pan in, with boiling water, and then put the teeny croissants in to rise. After an hour, I thought the oven wasn’t warm enough, so I put more hot water in. Then 20 min later I took the croissants out because it was time to turn on the oven… and butter had melted out. Yeh. So that made me feel pretty awful. Then, hilariously, because I was annoyed about that, I completely forgot to eggwash the croissants before they went in. Thus they did not quite crisp up as well as they should.
Nonetheless! I made croissants. And they aren’t terrible. They are even flaky!
 I also found a recipe to use the leftover bits of croissant pastry. Actually I think it was meant to be just the laminated dough but I used the bits I cut off as I went as well, so it didn’t puff up as much as they could have. I was going to make just the sweet version but then a friend pointed out that savoury could work too. So I made half with pistachio and raspberries, and half with a teeny bit of tomato paste and finely chopped mushroom. They’re ok… they didn’t work as intended because not all of the dough was fully laminated. Also, not making it from frozen probably impacted too.
So there we are. Croissants. Tick that off the bucket list.
 This here is a Kamado Joe. We own one now, as you may have heard in passing on my


 When my beloved saw that
 I’ve also made more bread, and experimented this time with different flour. I know I’ve seen baker’s flour before but couldn’t find it anywhere I looked – well, except for in 10kg bags and that seemed a bit much just at the moment. So I got Laucke bread mix, since the yeast is separate – I figured it was likely to be good for bread since it’s designed for bread machines… right?
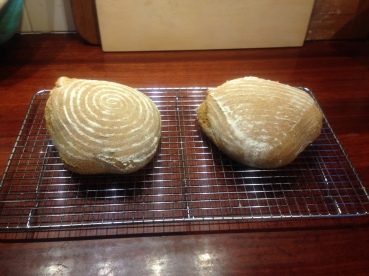 I have finally made my first batch of sourdough bread with my leaven (who might be Geoffrey… or Godfrey… or something like that…) thanks to
 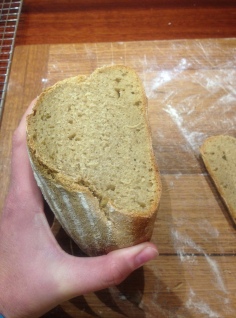 mixture, or… what. But it tasted pretty good, so

 More waiting. Drinking wine becomes less optional at this point.
 (closest to the pole, in the picture) really didn’t cook at all. The breast meat was mostly fine but we were a bit leary of the thighs so most of the chicken has gone into the freezer to be made into stock whenever I’ve got time. The potatoes looked good but also weren’t as cooked as we had hoped and wanted. We didn’t realise that the cage thing came as part of the ensemble, and hadn’t intended to get it; when camping we’re more likely just to do them in the dutch oven in the coals proper. However, it was very pleasant to sit outside with the fire and this was, as stated, our first experiment.