Once upon a time I decided that doing a sourdough course was a good idea. That was back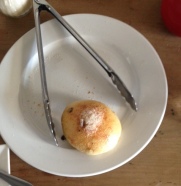 in January when I saw a sign at the RedBeard Bakery in Trentham advertising their courses. I took a photo; sent it to my friend Gill; and all of a sudden I was booking us in.
Our course was this past weekend, and it started with RedBeard’s “nice buns” and golly they were nice with a lashing of butter. There were originally nine on the plate….
Next we moved into the baking area and we got stuck 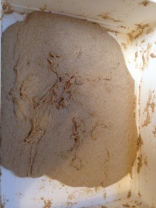 into actually making bread. Firstly we made a wholemeal dough, using RedBeard’s own leaven; this involved flour (1kg wholemeal, 200g rye, both stoneground) and water and salt and leaven, and then a lot of kneading. I love kneading; it’s wonderfully cathartic, and although it’s intensive I also found it lulled me with its rhythm. It looked like this, eventually. Very appealing, I think you’ll agree. It was way wetter than any of us (eight people on the day) had expected, which John – head baker and owner and teacher – stressed was incredibly important in creating a good sourdough.
 Then it had to rest for a while, so then we had a go at
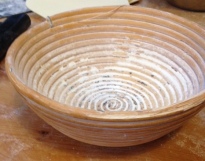
 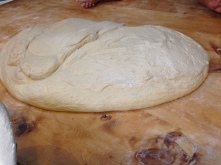 making a white sourdough with a dough that had been started a few hours beforehand by John’s sidekick. When John poured it out of the bucket, it reminded me of nothing else so much as the magic mud of my childhood (it’s all in the meniscus). With that dough we shaped cobs, using these awesome baskets that RedBeard has been using for however many years, and we made Vienna loaves, using their Belgian linen to make sure that the bread didn’t stick and stayed in shape.
These also had to wait for a while, before baking; 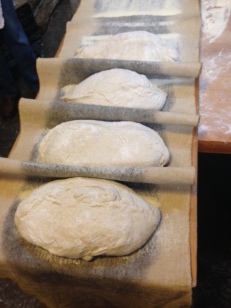 I think we then had lunch. To be honest, it all blurred together a bit – the order of things, that is – because it was a long day (10am to about 5pm). But I remember lunch very clearly, because it was amazing. There was bread, of course, with lashings of butter; and smashed roast potatoes and garlic; and a great salad with sprouts and lettuce and tomato and seeds; and a truly incredible free-form tart involving leek, goat’s cheese, roast capsicum, and other bits of deliciousness. The whole day was great but lunch was a really delightful moment of sitting down and appreciating food.
After lunch we shaped the wholemeal into three loaf tins. We also got to make our own leaven: potato peel, and rye flour, and water. That’s it. So now I have a leaven that I need to feed ‘for the rest of my natural life…’ – or if I’m going away I either need to phone a friend, or just accept that it’s deaded and I have to make another one. Happily, it only takes about three weeks for a leaven to be ready to use. Given 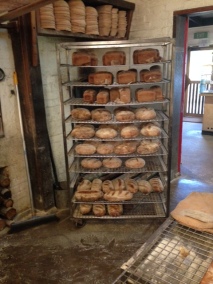 our household doesn’t eat THAT much bread, that’s not so bad.
Eventually it was time to cook the loaves, and that involved the most intimidating part of the day: using paddles and putting the bread into the very large, very hot oven. I didn’t die. No one died. When all of the bread was out, it looked like this. Yes, all of that that bread was shared between eight participants (and John took some too, actually). I came home with seven loaves. I made a lot of people at work quite happy when I gave it to them. (I did, rather guiltily, put a couple of the cobs into the freezer – John said we shouldn’t but I wanted to see what it was like for myself.)
The day wasn’t just about making and cooking bread. John was a wealth of information about the history of the bakery itself and sourdough in general. He’s very dismissive of ordinary yeast bread, rather than fully fermented sourdough, which made me a little dismissive because I do love making ‘normal’ yeast bread. It will be interesting to see whether I give it up in favour of the sourdough completely….
When I got home, we had leftover salad and bread. I now have a list of things I think I need – at least some sort of basket for shaping the cob, because there’s just something about a cob that appeals more than the high tin, for me. I also need to put bricks into the bottom of the oven, in order to increase its thermal mass; this is apparently a good idea for any oven, since it keeps the heat in rather than letting it all whoosh out when you open the order. Happily my darling doesn’t seem to mind the idea.
Edited to add: this is what my leaven looked like when I fed it for the first time, two days later…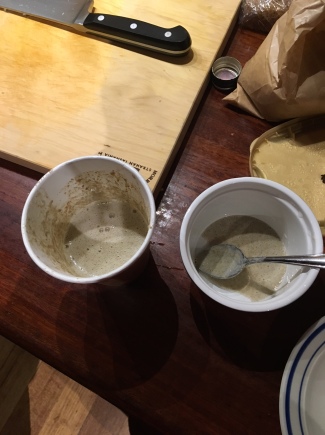
Sure hoping that’s ok!
 First, we bought wood, and scoped out the area where we might sacrifice some lawn to the Greater Needs of Vegetabling. That wood is 2.4m in length. It was Quite The Adventure getting it home. Let’s just say that I had to be careful where I moved my head while in the car.
 And here we have the vegetable boxes with actual plants and a watering system. The planting out involved some… false starts… well, one: I bought broad beans from Ceres, and beetroot and broccoli as well, but kind of forgot that brand new 1.5sq m of soil is likely to be quite dry. So I didn’t water them in enough. Which meant that the broad beans got totally deaded, and I got sad. So while I was out sourdoughing, my beloved and a friend went back to Ceres… and went a little mad. Buying broad beans (good), as well as snow peas and broccoli and beetroot. Forgetting or not realising that those already exist in the garden – snow peas are sprouting in toilet roll containers As We Speak. They also didn’t think about the fact that maybe I had planted some stuff that was, like, not yet above ground? Like garlic? And that maybe I had a plan for where other things would go? The upshot is we’re going to be (hopefully) eating a rather large amount of broccoli in the coming months, and beetroot too.
 A friend of ours who’s really into permaculture came over a few weeks ago and gave us a bit of a rundown about what we could change around the place. We’ve since created a vegetable patch – more on that later – and we’ve also invested in a worm farm.

 of the bitterness. Then let them simmer in a heavy sugar syrup (1:1) for about an hour. Allow to drip for a day… or more… then roll in sugar and stuff into jars.
 gingernuts before baking and that was a winner. Not sure where these will end up, as yet, but I anticipate they’ll keep pretty well.
 this is the same batch of orange peel I can only assume that I did not sterilise this jar as well as I should. Which is a really shame, since I think they were going to be very tasty.
 More birthday cupcakes! I’d been eyeing these off for a while but the ingredient ‘creamed coconut’ put me off because I had no idea what it was. I finally googled it and it’s just coconut butter/ oil – which I have, so that was easy. Interestingly, although they have both coconut butter and desiccated coconut, they ended up tasting more lime-y than coconut-y to me. They have lime zest in them, and I had a nicely sized kaffir lime on the tree so I used that. I’m not complaining about the taste – in fact I thought they were quite lovely (yes I make more than I give. Of course). I’ll be making these again – when I have limes to use, anyway.
 Salads and vegetables:
 Method:
 onions which was a bit sad, but it was ok nonetheless.)
 Yep; hotter and longer is the key to spit roast. Good to know. Also this was an excellent piece of meat to do in this way and we could definitely fit two onto the spit. Also very good to know. The meat cooked for about 3.5 hours; J thought this was too long, I thought it was fine, he’ll do it a bit shorter next time anyway.
 More waiting. Drinking wine becomes less optional at this point.
 (closest to the pole, in the picture) really didn’t cook at all. The breast meat was mostly fine but we were a bit leary of the thighs so most of the chicken has gone into the freezer to be made into stock whenever I’ve got time. The potatoes looked good but also weren’t as cooked as we had hoped and wanted. We didn’t realise that the cage thing came as part of the ensemble, and hadn’t intended to get it; when camping we’re more likely just to do them in the dutch oven in the coals proper. However, it was very pleasant to sit outside with the fire and this was, as stated, our first experiment.
 When I